Restaurant salmon has crispy skin and a juicy center, and the secret is not the pan or the fish. It is a 30 minute dry brine and a cold sear. Here is the science behind both, plus three 60 second pan sauces.
Charles Kim·Chef Fatty
June 17, 2026
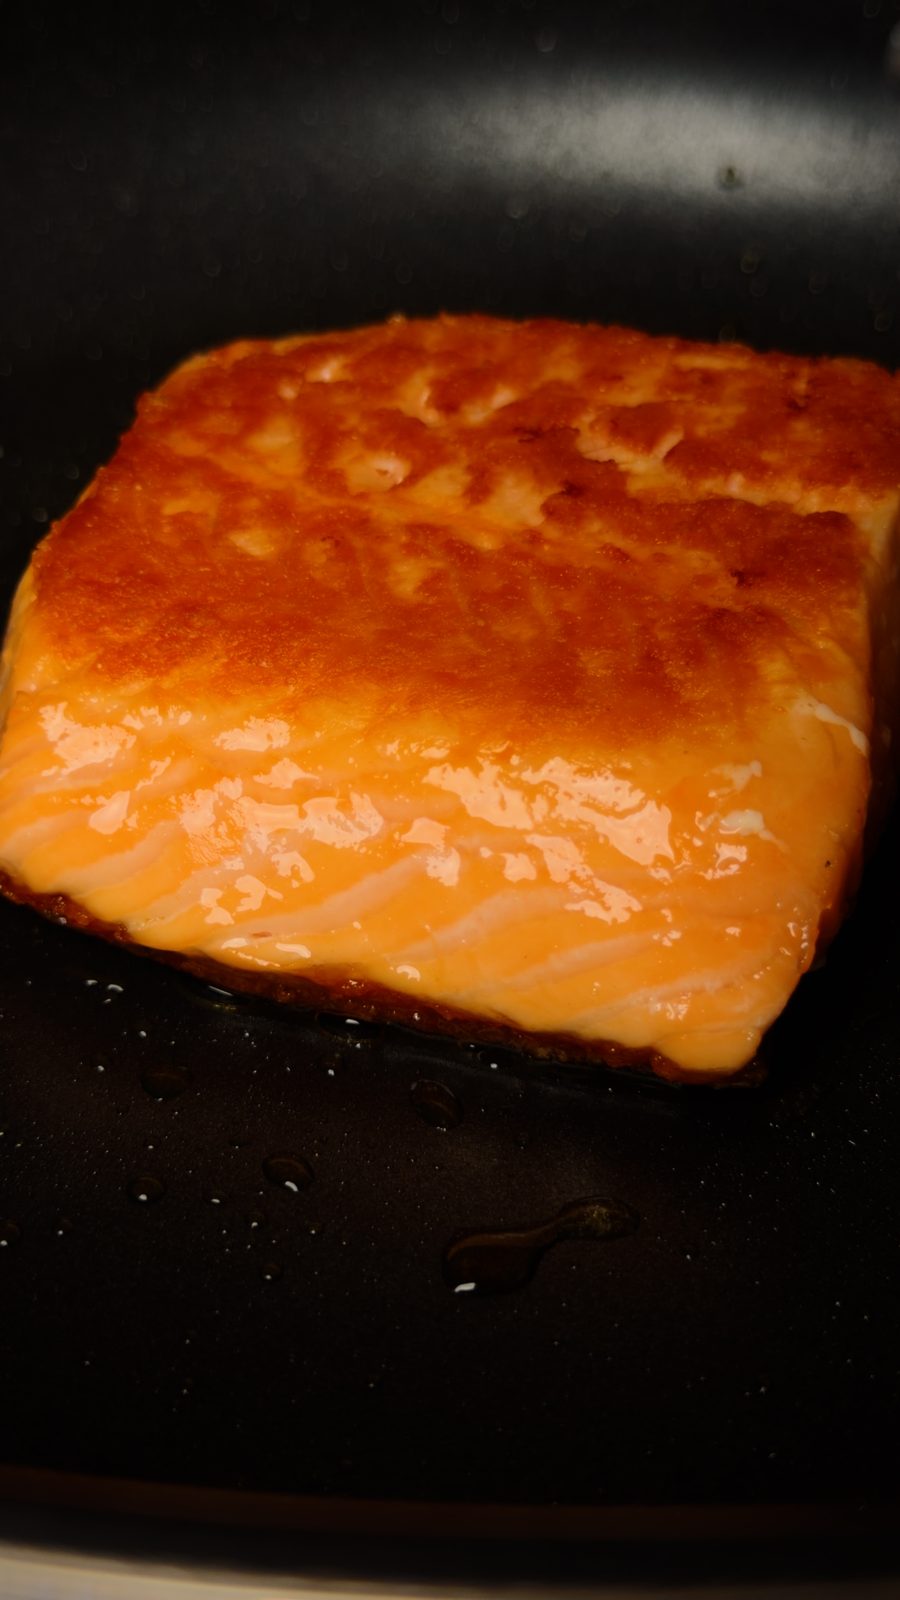
A deep golden crust, a moist center, and no white stuff. Two steps get you here, and neither one is hard.
Restaurant salmon has a crispy, shattering skin and a juicy pink center, and the secret is not the pan and it is not better fish. It is two things you do to an ordinary fillet, one before it cooks and one while it cooks.
Because most salmon fails the same two ways. It sticks to the pan and tears when you flip it, and it pushes out that chalky white stuff all over the top. Both problems trace back to the same root cause: heat, applied too fast and too hard.
The fix is a 30 minute dry brine before you cook, and a cold sear when you do. Together they take a few minutes of hands-on work and they change everything. Here is what is actually happening, step by step. The three pan sauces at the end are optional, and each one takes 60 seconds.
One thing to understand first, because it shapes the whole method. Salmon is a delicate fish and an unusually fatty one. The flesh is soft, it flakes apart easily, and it goes from moist to dry in a matter of seconds. That is the delicate part, and it is why everything below is gentle. But all that fat, especially the thick layer just under the skin, is a gift. Cooked right, it renders out and does the work for you: it crisps the skin, greases the pan so nothing sticks, and bastes the fillet as it cooks. The whole method comes down to one idea, protect the delicate flesh and put the fat to work.
The short version
For anyone who does not want to read all the science. The why behind each step is below.
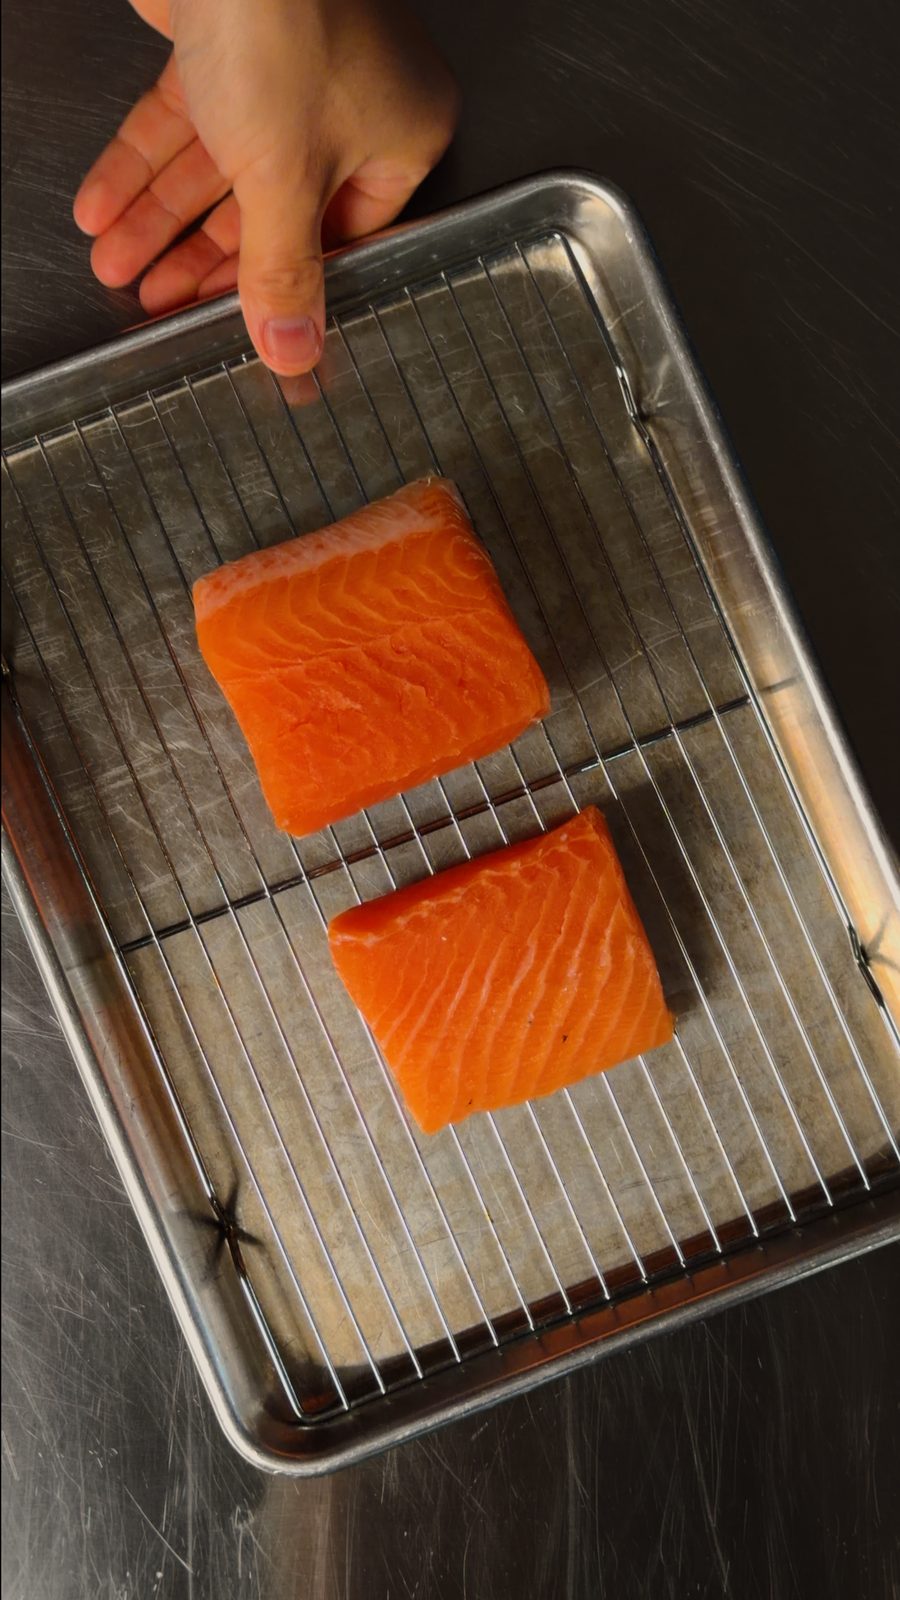
Salt and dry, 30 minutes ahead. Pat the fillets dry, salt both sides (about ½ tsp Diamond Crystal kosher per pound), and leave them uncovered on a rack in the fridge.
Start cold. Lay the salmon skin-side down in a cold, dry pan, then turn the heat to medium. Any pan works, nonstick to cast iron.
Do not touch it for 6 to 7 minutes. When the skin releases from the pan on its own, it is ready. If it still sticks, give it another minute.
Flip, 30 seconds, done. Pull it at 125°F in the thickest part. It carries over to about 130°F, a moist medium.
Optional pan sauce. Build one of the three sauces below right in the same pan, about 60 seconds.
First, what is the white stuff
This is albumin. It is harmless, but it means the fish was squeezed too hard by heat.
The white stuff has a name. It is albumin, a protein that lives in the watery juice inside the muscle. When salmon is raw, the albumin is dissolved and you cannot see it. When it heats up, two things happen at once.
The muscle fibers tighten and squeeze, the way a sponge squeezes when you wring it. That pushes liquid toward the surface. At the same time the albumin in that liquid cooks and turns solid and white, the same way a clear egg white turns white in a pan. So the white stuff is just cooked juice that got forced out of the fish.
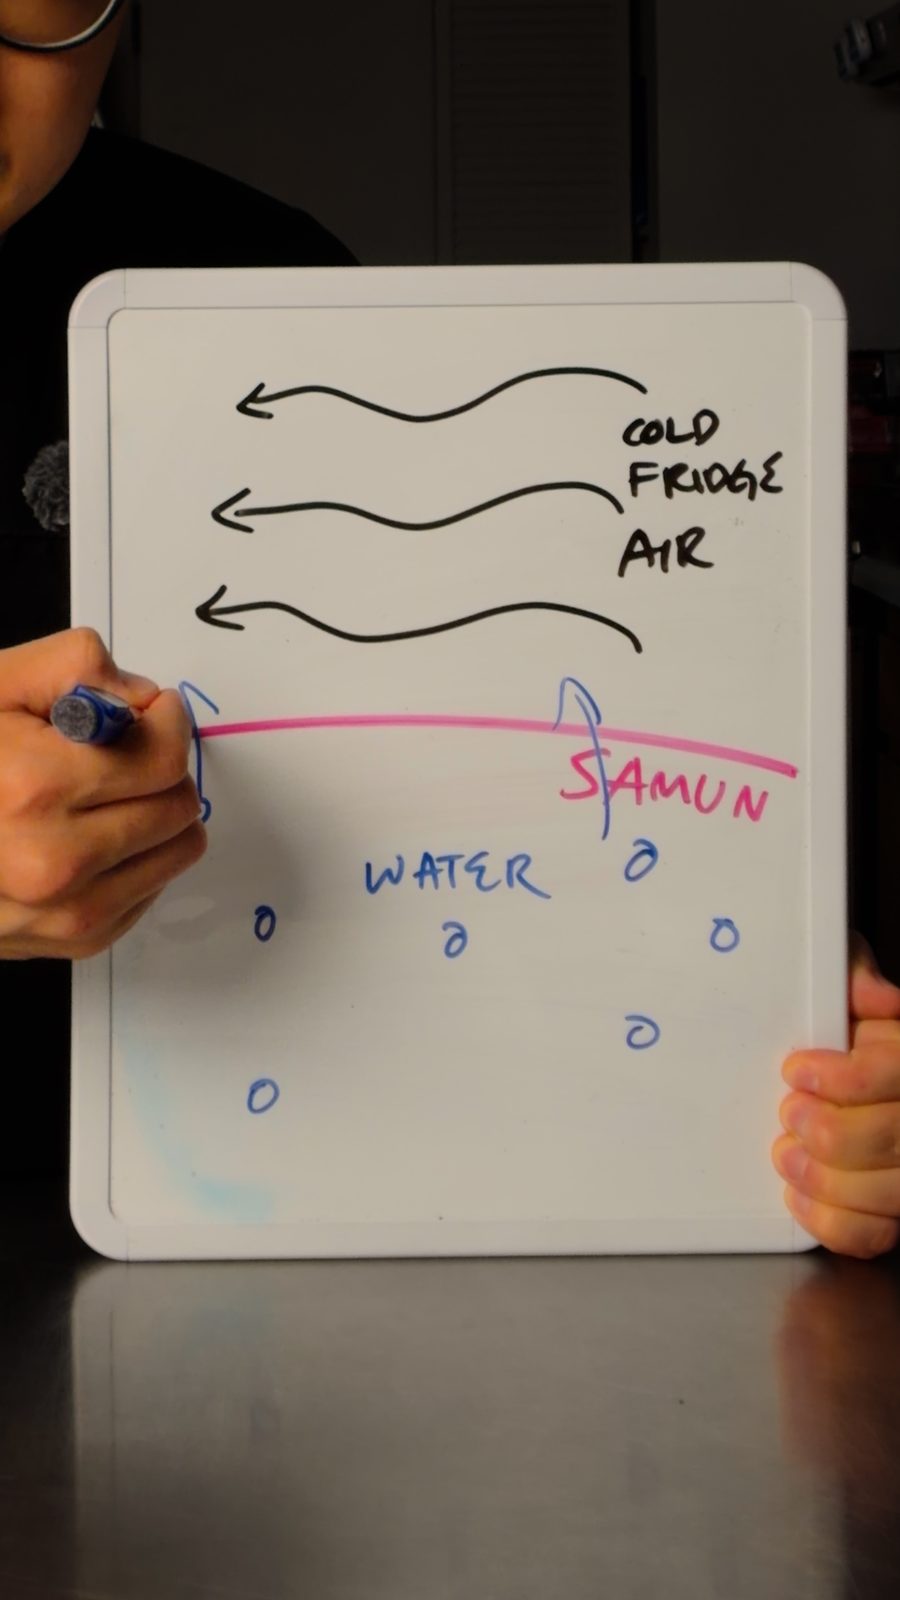
The squeeze gets worse the hotter and faster you cook. Albumin really starts showing up past about 140°F, and a fast, ripping-hot pan drives a lot of liquid out before the inside is even done. So the goal is simple: hold more of that water inside the fish, and cook gently enough that you do not wring it out. The dry brine handles the first job. The cold sear handles the second.
Step 1: Dry brine, 30 minutes ahead
A dry brine is just salt. You sprinkle it on the fish and walk away. For 1 pound of fillets, use about ½ teaspoon of Diamond Crystal kosher salt (or ¼ teaspoon of Morton kosher, which is denser) spread evenly over both sides. Then it sits on a wire rack, uncovered, in the fridge for 30 minutes.
Salt on both sides, set on a rack so air reaches every surface. Uncovered is the whole point.
Two different things happen during those 30 minutes, and both matter.
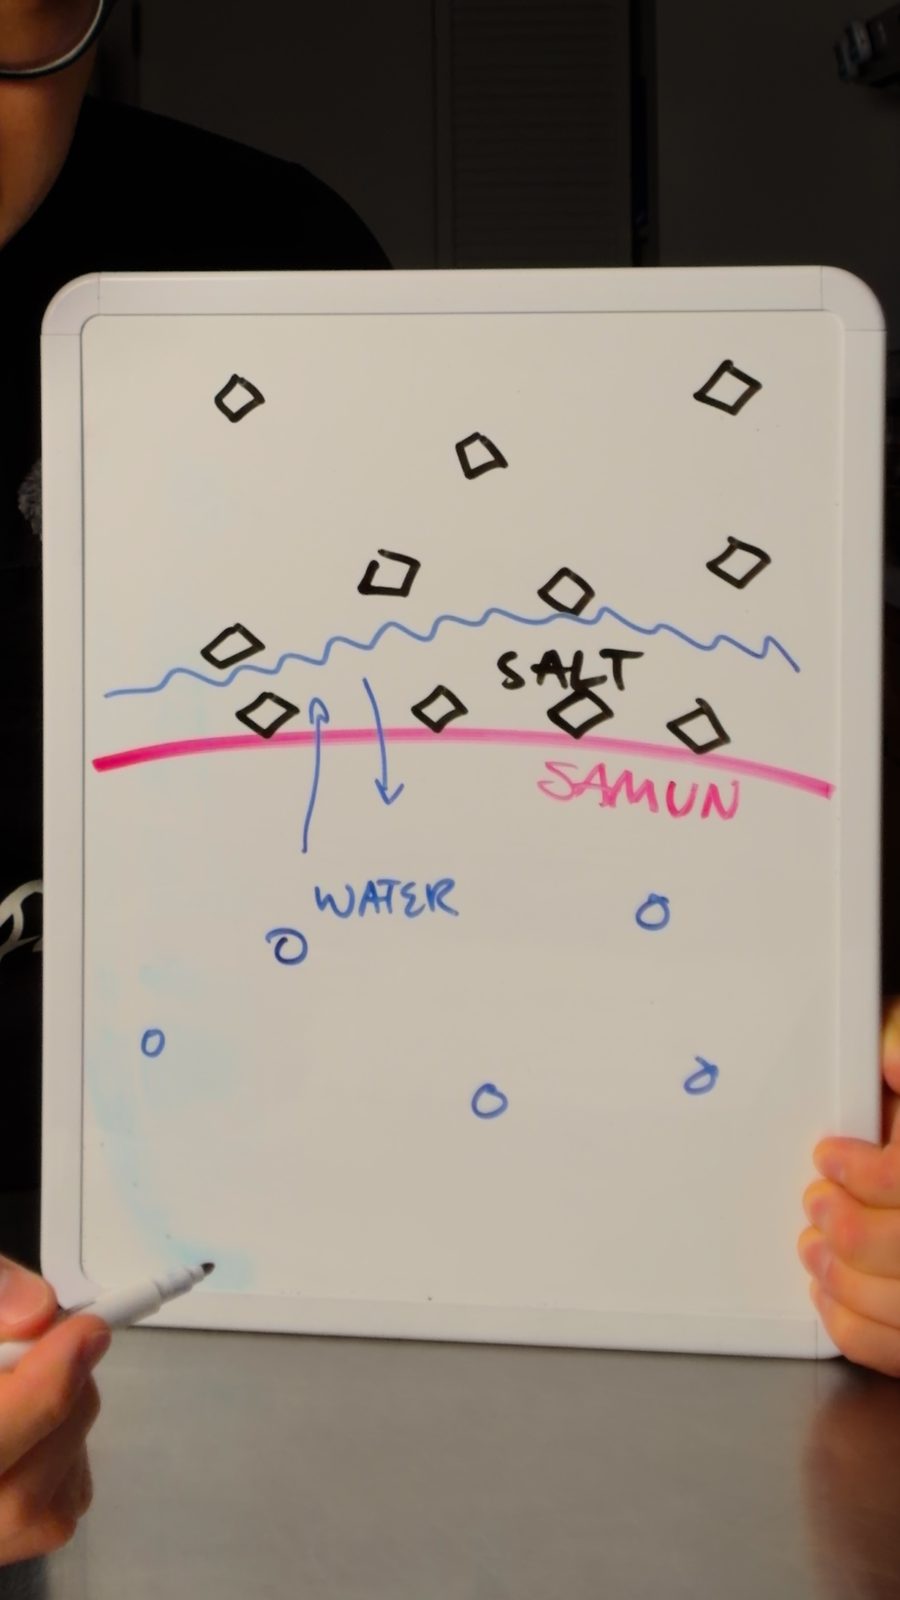
The salt seasons the fish through osmosis
Salt on the surface pulls water out of the fish. That is osmosis. Then the salty water gets reabsorbed, seasoned.
Salt and water always try to even out. When you put salt on the wet surface of the fish, the water inside is drawn toward it. That is osmosis, water moving toward the saltier side to balance things out. In the first few minutes the surface looks wet as a little water comes out and dissolves the salt into a strong brine.
Then it reverses. Over the rest of the half hour that salty brine soaks back into the fish, carrying the seasoning with it. So the salt does not just sit on top, it gets pulled inside. Along the way the salt changes the proteins themselves. It loosens them so they hold onto water better, like a slightly looser knot that grips instead of snapping tight. Fish that holds water better squeezes out less albumin when it hits the pan. That is the first defense against the white stuff.
One honest note: 30 minutes seasons the surface and firms it up. It does not salt the center all the way through. That takes overnight, and for a weeknight piece of salmon you do not need it.
The cold air dries the surface
Fridge air is cold and dry. Left uncovered, it wicks moisture off the surface so the skin can crisp.
This is why the fish sits uncovered, not wrapped. The air in your fridge is cold and dry. Cold dry air is thirsty, so it pulls moisture off whatever is exposed to it, the same reason your lips chap in winter. Over 30 minutes it wicks the surface of the salmon dry.
A dry surface is the whole game for browning. Water has to boil off before anything can brown, so a wet fillet spends its first minutes in the pan just steaming itself gray. A surface that is already dry skips straight to browning and crisping. This is also how you get skin that shatters instead of skin that turns to rubber.
The skin is insulation, not garnish
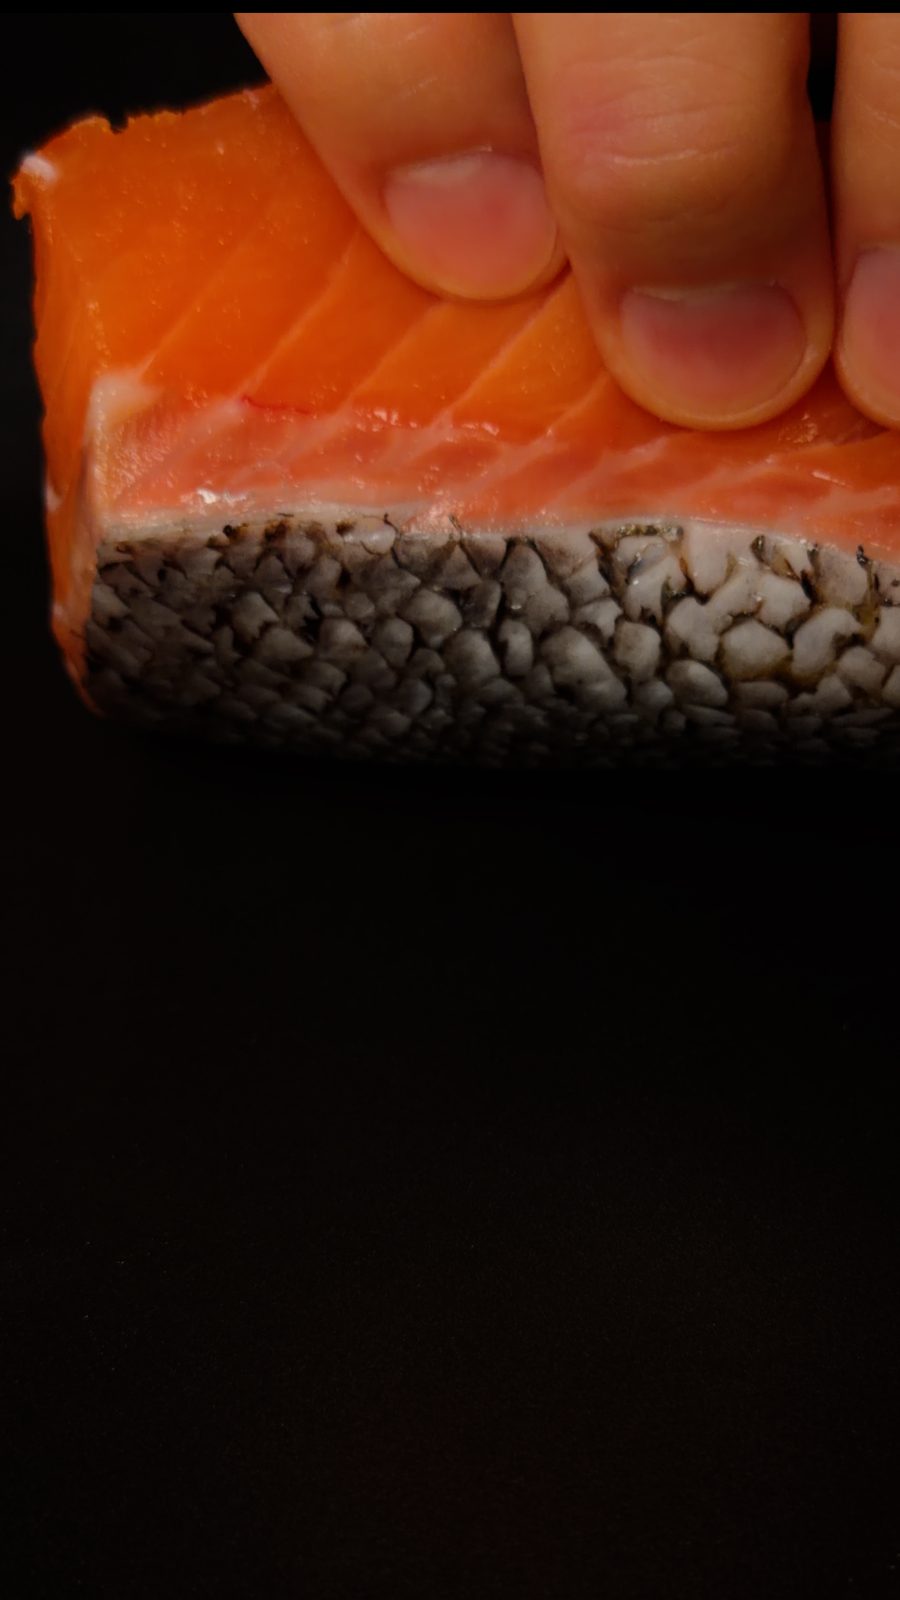
Look at the cut edge. Between the flesh and the skin there is a pale strip of fat. That fat is the secret.
Look at the side of a skin-on fillet and you can see three layers: the orange flesh, a thin pale line of fat, and the skin. That fat layer is the reason you cook salmon skin-side down, and the reason you do not need to add oil.
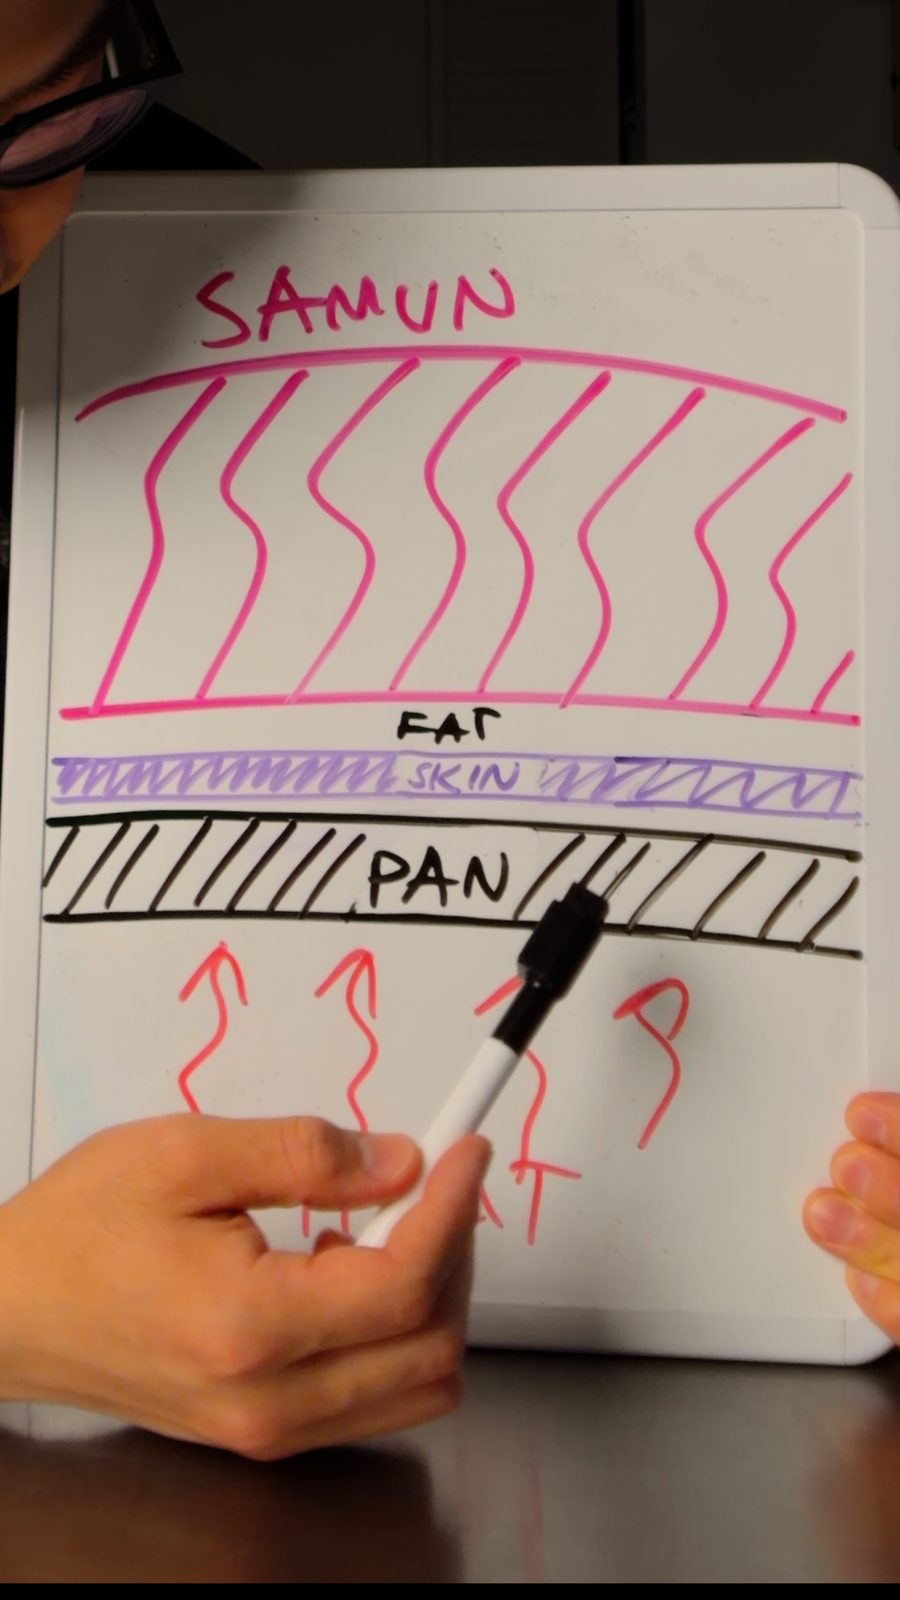
As the pan warms, the skin protects the delicate flesh from the direct blast of the metal, like a heat shield. And the fat trapped just under the skin melts and renders out, basically frying the skin in its own oil. The skin crisps, the flesh underneath stays gentle, and you never poured a drop of oil into the pan. But all of that only works if the fat has time to render slowly. Rush it and the skin seizes, curls, and sticks. Which brings us to the cold sear.
Step 2: The cold sear
Heat climbs from the pan, through the skin, through the fat, into the flesh. Start cold so it climbs evenly.
Almost everyone preheats the pan screaming hot and drops the fish in. Do the opposite. Lay the salmon skin-side down in a cold, dry pan, and only then turn the heat to medium. You let the pan and the fish come up to temperature together. You are aiming for a pan around 325 to 350°F, and you do not want it to climb much past 400°F (200°C). That ceiling is the top of the browning range. Push hotter and the skin scorches and curls before the inside has caught up, which is the exact problem you started cold to avoid.
Why start cold at all? It comes down to when the fat melts. Salmon fat is mostly unsaturated, the same omega-3 fat that stays liquid in cold ocean water, so it has a low melting point. It is soft at room temperature and renders freely at low heat, well under 150°F, while browning the skin does not even begin until around 300°F. Starting cold parks the skin in that low, fat-rendering window for a few minutes on the way up, so the fat melts out and greases the pan before the surface is ever hot enough to seize. Drop the same fillet into a screaming hot pan and you skip that window: the skin clamps down and curls before a drop of fat has rendered, and that is exactly when it sticks and tears.
Starting cold does three things at once:
The fat becomes a natural non-stick layer. As the pan slowly warms, the fat trapped between the skin and the metal melts and spreads into a thin film of oil. The fish fries on its own rendered fat, which is exactly why you never add any.
The skin tells you when it is ready. Protein grips hot metal the instant it lands, then lets go once it has seared. Once that fat is fully rendered and the skin is crisp, it lifts off the pan on its own. If it still feels stuck, it is not done. Wait.
The inside cooks gently. A slow ramp means the muscle never gets that violent squeeze, so far less albumin gets forced out. The same gentleness that gives you crisp skin also keeps the white stuff away.
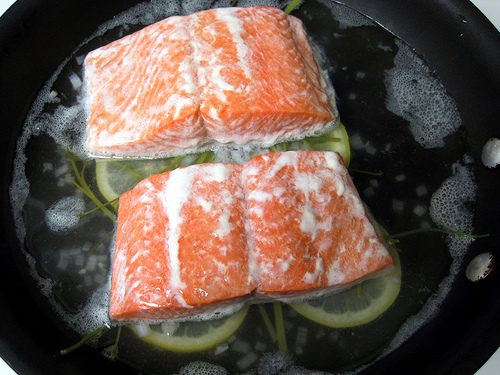
Leave it alone, skin-side down, for 6 to 7 minutes. Do not poke it or slide it around. You will see the flesh turn opaque creeping up from the bottom. When the skin releases easily from the pan with no fight, it is ready. Flip it, cook 30 seconds on the flesh side, and pull it. That short second side is all it needs, because the skin side did almost all the cooking.
Any pan works, and the skin tells you when
This is not a nonstick trick. The cold sear works in any pan: nonstick, stainless steel, enameled, or bare cast iron. The release does not come from a coating. It comes from the fat rendering into that thin film of oil and the proteins setting as they sear, and that happens no matter what the pan is made of.
So the skin itself is your gauge. If it does not lift off the pan on its own, it is not ready yet. A fillet that is properly seared lets go without a fight. One that still grips just needs another minute. This matters most in stainless or bare cast iron, where the skin clings harder at the start and a forced flip will tear it. In those pans a thin film of oil to start is cheap insurance while the fat renders. In nonstick you do not even need that.
Pull it early and let carryover finish
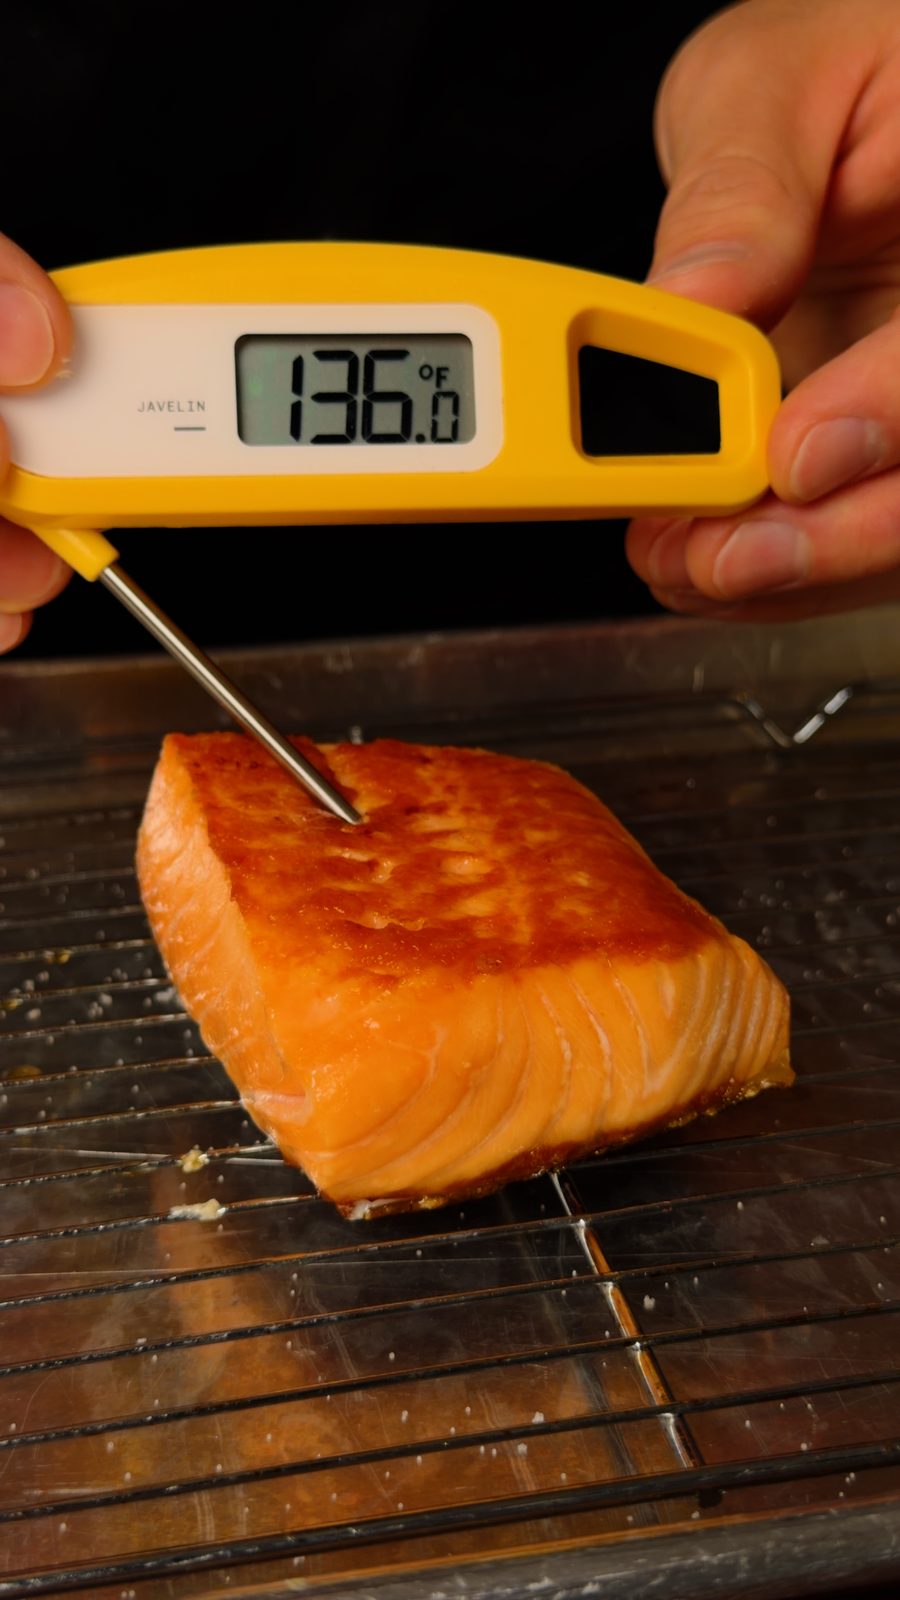
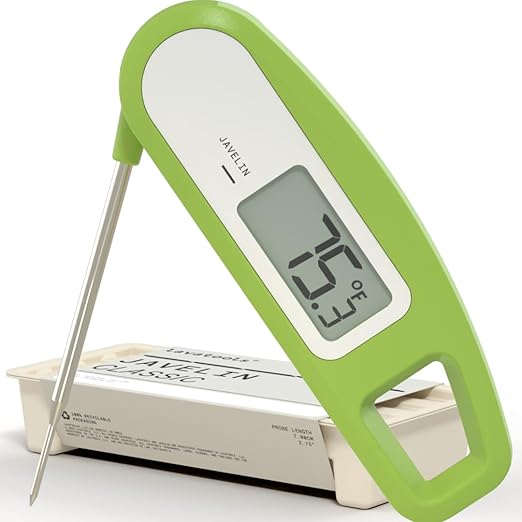
The only way to actually know. An instant-read probe in the thickest part beats guessing every time.
Here is the trap. By the time salmon looks fully cooked through, it is already overcooked. The fish keeps cooking after it leaves the pan, because the hot outer layers keep pushing heat into the cooler center. That is carryover, and it is worth about 5 degrees.
So you pull early. Take the fish off the heat at 125°F in the thickest part, and carryover will drift it up to about 130°F as it rests. That lands you at a moist medium. Chase the color instead of the number and you will sail past it into dry, flaky, white-streaked territory every time. A good instant-read thermometer takes the guessing out of it, and on a piece of fish that costs what salmon costs, that is the cheapest insurance you can buy.
Here is where to pull, depending on how you like it. One catch: these are the final temperatures after the fish rests, so thanks to carryover you take it off the heat about 5°F below the number you want.
Doneness
Final internal temp
Rare
110 to 120°F
Medium rare
120 to 125°F
Medium, my pick
125 to 135°F
Well done
140 to 145°F
One safety note. Medium comes in around 130°F, but the temperature that kills parasites in fish is 145°F. So any time you cook salmon below that, the safety does not come from the heat, it comes from the fish being frozen first. Freezing to the raw-fish standard, -4°F for 7 days or colder and faster, kills them. Most farmed Atlantic salmon is raised on feed that leaves very little parasite risk, and anything sold for sushi or raw eating has already been frozen this way, so taking either to medium is fine. If you are working with wild-caught salmon and cooking it below 145°F, freeze it first or buy it labeled for raw use. Salting and marinating do not kill parasites.
Three 60-second pan sauces
When you pull the salmon, the pan is not empty. It is holding rendered fat and little browned bits stuck to the bottom. That is fond, and it is pure flavor. Do not wash it away. Build a sauce right in the same warm pan over medium heat and it comes together in about a minute. Pick one, or make all three for a few fillets.
Lemon Caper Butter
Melt 3 tablespoons unsalted butter, then add 1 tablespoon capers, 1 tablespoon fresh lemon juice, and ½ teaspoon lemon zest. Swirl until it comes together and spoon it over. Bright, salty, classic.
Honey Soy Ginger Glaze
Add 3 tablespoons soy sauce, 2 tablespoons honey, 1 teaspoon grated ginger, and 1 clove garlic, minced. Let it bubble until it turns glossy and coats the back of a spoon. Sweet, savory, sticky.
Maple Bourbon Glaze
Add 3 tablespoons pure maple syrup and 1 tablespoon bourbon, let it reduce for a few seconds, then swirl in 1 tablespoon unsalted butter off the heat to finish. Deep, warm, a little smoky.
No oil, no sticking, no tearing, no white stuff. Crisp skin and a moist center, from two steps that cost you almost no extra effort. That is the whole trick.
Weekly articles
Enjoy the science? There's more every week.
New food science article every week. Sign up free to get notified, or go ad-free with membership.
The skin-release test and the shape of the fillet get you close, but the only way to truly nail a moist medium center is to measure it. The Javelin reads in under 3 seconds, folds flat, and is accurate to within 0.9 degrees F. Pull your salmon at 125 F and let carryover finish it at 130 F. On a piece of fish that costs what salmon costs, it is the cheapest insurance there is.