Stainless steel is the most misunderstood thing in your kitchen. People buy it because it looks professional, then get frustrated when eggs weld themselves to the pan, rainbow stains show up after one batch of chicken, and the bottom turns brown no matter how hard they scrub. None of that means you bought a bad pan. It means nobody ever explained the metal. So here is the whole thing: what stainless actually is, how to read the numbers on the box, how to cook on it so food releases on its own, and how to make a five year old pan look like it came out of the box this morning.
The Stainless Steel Guide: How to Pick It, Cook on It, and Make It Look New Again
Stainless does not mean stain-proof, it means stains less. What 18/10 actually means, why the best stainless pan is mostly aluminum inside, the preheat test that stops food from sticking, and the one cleaner that brings back the shine.

Charles Kim·Chef Fatty
August 5, 2026
What stainless steel actually is
Stainless steel is ordinary steel with at least 10.5 percent chromium mixed in. The chromium is the entire trick. The instant it touches air, it forms an invisible layer of chromium oxide over the whole surface, a film just a few atoms thick. That film is what keeps the iron underneath from rusting. Scratch it, and it heals itself in seconds, as long as air can reach the metal.
This is why the name is honest if you read it carefully. It is not stain-proof steel. It is steel that stains less. The oxide film shrugs off water, acid, and salt far better than bare steel, but it can still discolor, and one specific enemy can punch permanent holes in it. More on that below.
Decoding 18/10, 304, and the magnet trick
The numbers on cookware boxes are just recipes for the metal:
- 18/10 means 18 percent chromium, 10 percent nickel. Chromium prevents rust. Nickel adds extra corrosion resistance and the bright, jewelry-like shine. This is the good stuff, and it is what you want touching your food.
- 18/8 is nearly the same thing with a little less nickel. Metallurgists call it type 304. In a kitchen, 18/8 and 18/10 behave the same.
- 18/0 (type 430) has no nickel. It is duller, slightly less corrosion resistant, and cheaper. It is also magnetic, which is why it shows up on the outside of induction cookware.
- 316 adds molybdenum for serious chemical resistance. It is the marine grade. Wonderful metal, unnecessary in a kitchen, and you pay for it.
The magnet trick: a magnet sticks to 18/0 but not to 18/10. If a magnet sticks firmly to the inside of a cheap pan claiming to be 18/10, the label is lying. If it sticks only to the outside bottom, that is normal, that layer is there on purpose so induction cooktops can grab it.
Why the best stainless pan is mostly aluminum
Here is the dirty secret: stainless steel is a terrible conductor of heat, roughly fifteen times worse than aluminum. A pan made of pure stainless would scorch food in rings directly over the flame and stay cool everywhere else.
So good cookware is a sandwich. A layer of aluminum (or copper) does the heat-spreading in the middle, and thin skins of stainless protect it inside and out. That construction is called cladding. When a box says tri-ply or 3-ply fully clad, it means the aluminum core runs through the whole pan, up the walls and all, so the entire pan heats evenly. Cheaper pans instead weld a disc of aluminum to the bottom only. Disc-bottom pans work fine on gas for boiling and steaming, but the walls run cold, sauces catch at the edge of the disc, and the disc can warp away from glass cooktops.
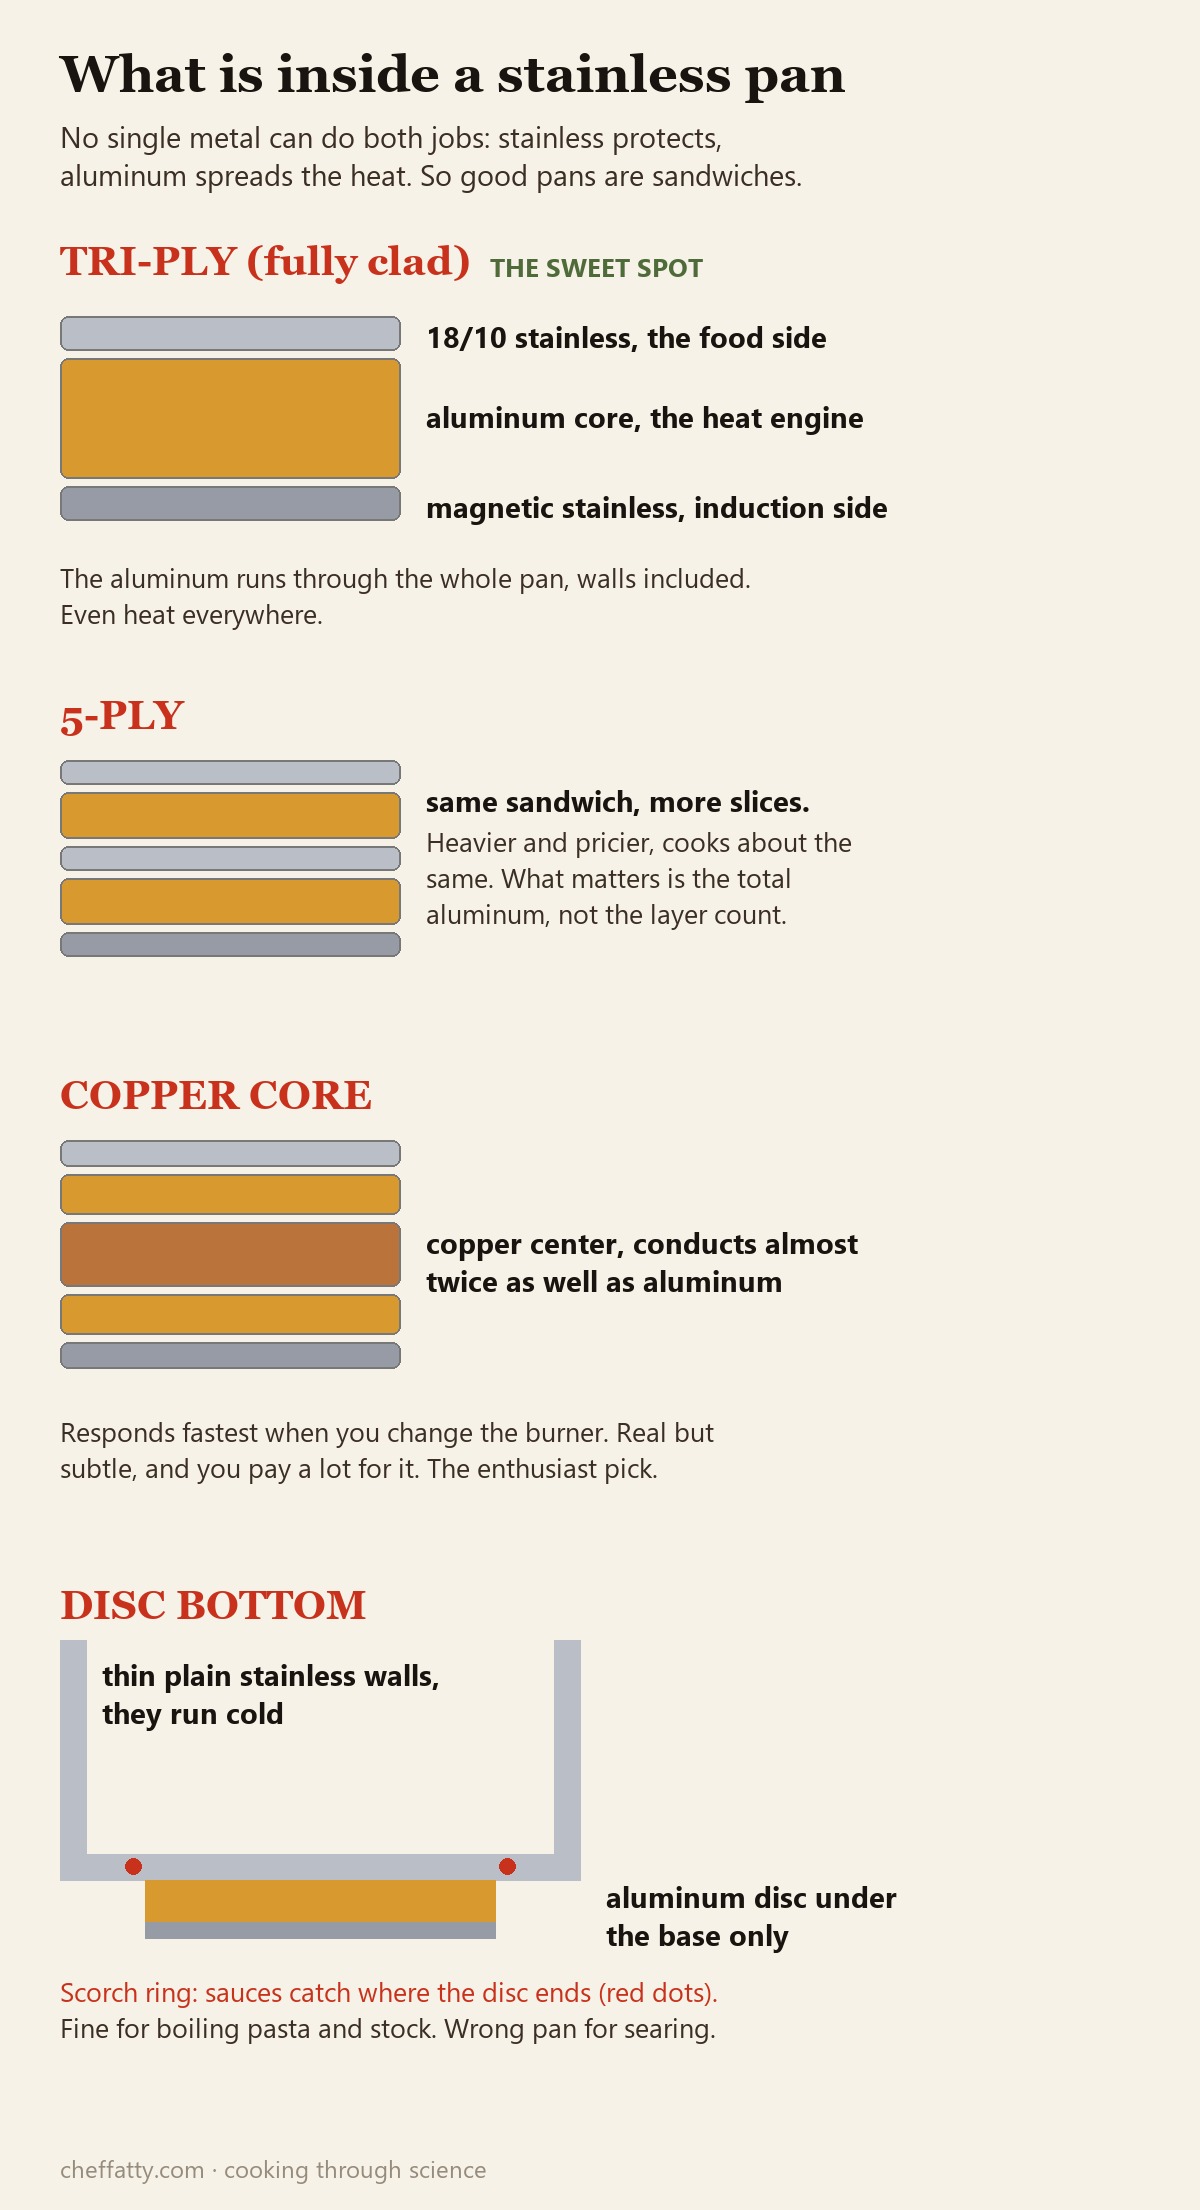
Five-ply and seven-ply exist mostly for marketing. More layers add weight and cost, not meaningfully better cooking. The one upgrade that does something real is a copper core: copper conducts almost twice as well as aluminum, so the pan reacts faster when you adjust the burner. Nice to have, never necessary. Fully clad tri-ply is the sweet spot and has been for decades.
How to pick a stainless pan
- Fully clad, not disc bottom. The words to look for are "fully clad" or "clad through the walls."
- 18/10 cooking surface. Bright interior, non-magnetic on the inside.
- Riveted handle. Welded handles on budget pans can eventually pop off. Rivets do not.
- Some weight. A 12 inch skillet should feel substantial, around 2 to 3 pounds. Featherweight means a thin core, which means hot spots.
- Induction check if you need it. Magnet must stick to the outside bottom.
- Spend about $50, not $150. Every spec above is available at the budget end of fully clad. Past roughly $50 you are paying for the name and how the handle feels, not for better cooking.
You do not need a set. A 10 or 12 inch skillet plus a 3 quart saucepan cover almost everything, and the budget end of fully clad (Tramontina Tri-Ply Clad, the exact pan I have cooked on for four years) performs within a hair of pans costing three times as much (All-Clad D3, if you want the buy-once version). The expensive pan is nicer to hold. It does not cook better.
How to cook on it so nothing sticks
Food sticks to stainless for one reason: proteins bond chemically to metal that is at the wrong temperature. The fix is not more oil. The fix is heat, in the right order.
- Preheat the dry pan on medium, and mean it. A 5 or 6 out of 10 on the dial, for 2 to 3 minutes. Not max: high heat overshoots, burns your oil, and leaves no room for error.
- Do the water test. Flick in a few drops of water. If they sizzle and vanish, keep waiting. When a drop balls up into a marble that skates around the pan like mercury, the surface has passed roughly 380 F and it is ready. That skating drop is called the Leidenfrost effect, a cushion of steam forming under the droplet, and it is the most reliable pan thermometer that exists.
- Now add oil, swirl, and give it 30 seconds.
- Then add food, and leave it alone. Protein will grip the pan at first. As the crust forms, it releases on its own. If the chicken will not lift, it is not done searing. When it is ready, it lets go.
One thing that confuses everyone: the pan does not stay at 380 F while you cook, and it is not supposed to. Adding food drops it into the low 300s, which is the correct cooking zone. The preheat is about winning the first ten seconds: sticking happens when raw protein touches metal and bonds to it, and that can only happen while the contact surface is still raw. A properly preheated pan carries enough banked heat to cook and dry that surface instantly, so the crust forms before the bonds can. After that, the temperature drop does not matter.
Which also explains the two ways it fails. Cold, wet, or crowded food crashes the temperature further than the banked heat can cover, so pat the protein dry and cook in batches. And moving the food during the early grip phase tears it, so do not.
The reward for cooking on steel instead of nonstick is the brown crust left in the pan, the fond. Splash in wine, stock, or even water, scrape, and you have a pan sauce nonstick can never give you, because nonstick is designed to prevent exactly the sticking that builds it.
Save the nonstick pan for eggs and delicate fish. Use stainless for everything you want browned.
Make it look new again
Every stainless complaint has a specific cause and a specific fix:
- Rainbow tint. Heat thickened the chromium oxide layer just enough to bend light, the same physics as a soap bubble. Completely harmless. A splash of vinegar wiped over the spot dissolves the excess and the rainbow is gone.
- White chalky spots or film. Minerals left behind by evaporated hard water. Vinegar again, then rinse and dry.
- Brown or burnt-on patches, the pan that "will not come clean." This is oil that overheated and polymerized onto the steel, a cross-linked layer that dish soap alone cannot touch. The fix from the reel: 1 cup baking soda, 6 tablespoons hydrogen peroxide, and a teaspoon of dish soap, mixed into a paste. Each ingredient has a job. The baking soda is a mild alkali and a gentle abrasive that will not scratch. The peroxide is an oxidizer that attacks and weakens the burnt polymer network. The soap grabs the loosened fragments and carries them off so they rinse away instead of redepositing. Spread it on, let it sit a few minutes, scrub with the grain, rinse. And a myth worth killing while we are here: Bar Keepers Friend is not the tool for this job. Its oxalic acid is a specialist in the other stain family, rust, heat tint, and hard-water film, which is why it disappoints on thick baked-on oil no matter how hard you scrub.
- Burnt-on food. The reel method: boil equal parts vinegar and water in the pan for a few minutes. Hot dilute acid breaks the burnt layer's grip on the metal, and most of it lifts with a wooden spoon before you ever scrub.
- The one real danger: salt in cold water. Undissolved salt sitting on the bottom of a pot attacks the oxide layer in tiny concentrated spots and drills permanent pinholes, called pitting. Add salt after the water is boiling, when it dissolves instantly, and never let salty water sit in a pan overnight. Bleach does the same kind of chloride damage. Never bleach stainless.
Quick answers
- What percent hydrogen peroxide? The regular brown-bottle 3 percent. Stronger exists, but it buys almost nothing here: baking soda makes the paste alkaline, and peroxide breaks down fast in alkaline conditions, so most of the extra strength just fizzes away. What it does buy is bleached skin and burned eyes; 12 and 35 percent are lab chemicals, not cleaning supplies. The recipe was tested at 3.
- Does the paste work on nonstick or ceramic pans? No, and it should not be needed. Those coatings release stains with warm soapy water, and scrubbing them with any abrasive shortens the coating's life. The vinegar boil is safe on them for mineral film.
- On HexClad? The vinegar boil, yes. Go easy with the paste: the raised stainless ridges can take it, but the nonstick valleys between them should not be scrubbed hard.
- On cast iron or carbon steel? Absolutely not, and here is the fun part: the brown polymerized oil layer this article teaches you to remove is exactly the layer cast iron users spend months building on purpose. On those pans it is called seasoning, and it is the whole point. Never take this method near them.
- On enameled cast iron, like a Dutch oven? The baking soda paste is gentle enough for stains on the enamel. Skip harsher powders, and vinegar is fine.
- On burnt baking sheets? Yes, the paste is the right tool, just budget more elbow work. Skip long vinegar soaks on bare aluminum sheets, acid can discolor them.
- How do I prep a brand new stainless pan? Wash it with soap to remove manufacturing residue, dry it, done. Stainless needs no seasoning, ever. That is half the reason to own it.
- Do I do all this every time? No. Everyday cleanup is warm water and dish soap like any pan. The vinegar and the paste are occasional deep cleans, and if you preheat properly (see the cooking section above), you will need them far less often.
- Dishwasher? Go ahead, it is steel. Two footnotes: detergent slowly turns the mirror polish satin over the years, and on clad pans it can etch the thin exposed aluminum ring at the rim. Both are cosmetic. If you love the shine, hand wash; if you love your evening, dishwasher. Burnt-on oil will not come off in there either way, that is what the paste is for.
- Metal utensils? Fine. Scratches are cosmetic. The oxide layer reforms instantly, and a scratched pan cooks exactly like a new one.
- Scratched or scorched beyond hope? It almost never is. The vinegar boil and the paste handle almost everything, and Bar Keepers Friend erases the discoloration that remains.
- Fingerprints on appliance fronts? Different problem, different tool: a stainless polish wiped with the grain, then a dry microfiber cloth.
That is the whole subject. Buy fully clad, read the numbers, preheat until the water drop skates, and keep a can of oxalic acid under the sink. The pan will outlive you.
Weekly articles
Enjoy the science? There's more every week.
New food science article every week. Sign up free to get notified, or go ad-free with membership.
What to buyAffiliate links
The three things that keep stainless looking new, matched to the fixes above. As an Amazon Associate, Chef Fatty earns from qualifying purchases.

Tramontina Tri-Ply Clad Skillet (your pick)
The pan I have cooked on for four years. Fully clad tri-ply, induction-ready, and it still looks new using nothing but the routine in this guide. The budget fully-clad pick that performs with pans three times the price.
Buy on Amazon
Bar Keepers Friend Powder Cleanser
For the stain family the paste cannot touch: rust spots, heat tint, and hard-water film, plus the final polish once the gunk is off. Not the tool for thick baked-on oil, its acid works on metal oxides, not burnt polymer.
Buy on AmazonWhat to read next
Comments
Sign in to join the discussion.Sign in
Members only
Go ad-free for $1/week
Remove all ads across the site, unlock chef's notes and dietary substitutions, and support the science content that keeps coming.
Get Membership
